

Are you a newbie? Recently started development? Don't know how to proceed with the basic knowledge you have?
Let me help you to create your first mini project by demonstrating a simple CLI quiz that you can build with some basic concepts.
CLI on the above line stands for command line interface, and it means we will be using the command line or terminal to interact with the user.
So, you might be wondering what concepts we will use for this, right?
Concepts that will be used:
- array
- for loop
- if...else if…else statements
- template literals
Let's start.
I would recommend you to do the following steps on replit.com which is a powerful online editor. To get started go on replit.com, create your account, and then click on 'New repl'.
Choose JavaScript or Node.js as the language, give a name to your project and click on 'Create repl'.

Firstly, we will have to create a set of questions for the quiz. Choose any topic of your interest and try to frame at least 5 questions.
I like Geography, so my quiz will be based on some Geography questions.
Create a file naming it as questions.js.

Create a variable of array type and store your questions inside it. In my case, I will be providing the user 3 choices to choose from. So along with the question, the user will also see 3 options to choose from on the terminal.
For example:
var questions=[
  {
    question:"What is the capital of USA?",
    "a":"Washington",
    "b":"New York",
    "c":"Seattle",
    "ans":"a"
  },
  {
    question:"which is the the largest continent?",
    "a":"Alaska",
    "b":"Antarctica",
    "c":"Asia",
    "ans":"c"
 }];
I have taken an extra variable to store the correct answer. Since we will be writing our main code in the index.js file, we will need to export this questions variable in that file. To do so we will use module.exports = questions
//write this in the questions.js file after the array variable
module.exports = questions;
Now let's move on to the interesting part, displaying questions and interacting with the user using the terminal.
Let's work on the index.js file.
We will be using the readlineSync package to interact with the user. To use it we need to use the following syntax
var readLineSync = require('readine-sync');
Along with this we also need to import the questions variable. To do that write
var questions = require('./questions');
Let's welcome the user! For doing so you can display a welcome message at the starting of the quiz.
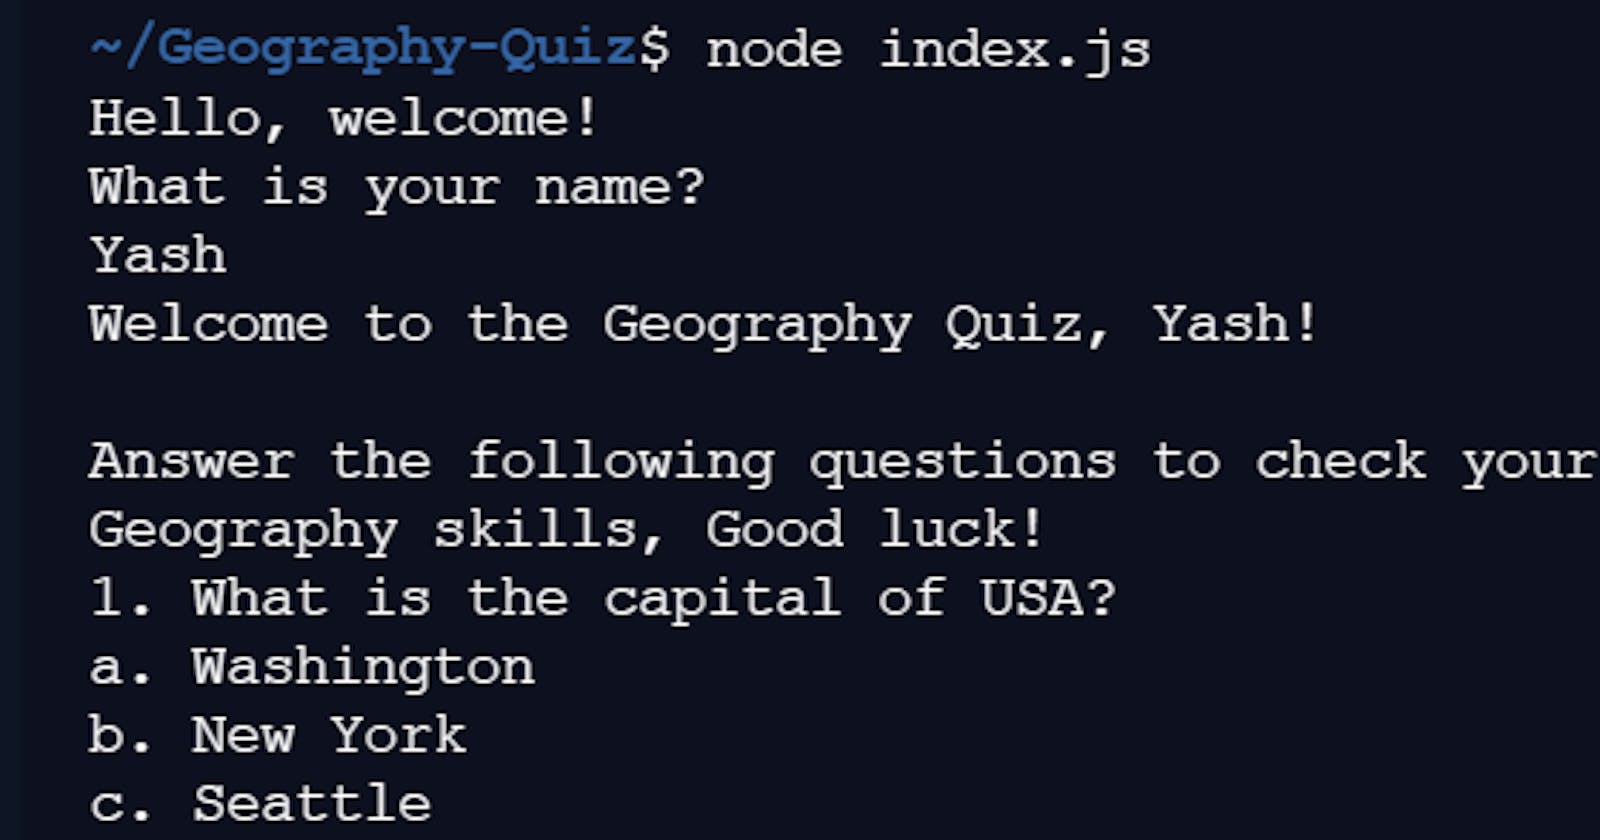
console.log('Hello, welcome!');
Ask the user his or her name. To do so you will have to use readLine-Sync since you will be taking input from the user.
var username = readLineSync.question("What is your name?\n");
Now whatever value the user will enter, will get stored in the variable username.
Welcome the user and start the quiz :)
console.log("Welcome to the Geography Quiz, "+ username +"!\n");
console.log('Answer the following questions to check your Geography skills, Good luck!')
You might want to show the score to the user after the quiz gets over.
To do so declare and initialize a variable, score to 0.
var score = 0;
Next task is to display the questions in our questions array one by one along with the options. To do so we will be using a for loop.
for(var i=0; i<questions.length; i++){
  console.log(`${i+1}`+". "+questions[i].question)
  console.log("a. "+questions[i].a)
  console.log("b. "+questions[i].b)
  console.log("c. "+questions[i].c)
}
To get user input for the option you will have to use a variable to store the answer.
var ans = readLineSync.question("Enter your choice\n");
Next step will be to check if the option chosen by the user is correct or not.
To do that we will use the following code. If the answer matches, increment the score by 1 otherwise don't change.
Note: You can decrement the value by 1 if the choice is wrong, but it might lead to a negative score.
if(ans === questions[i].ans){
    score = score + 1
    console.log(`Correct Answer!\tScore: ${score}`)
    console.log()
}
else{
  console.log("\nWrong Answer :(  "+`Score: ${score}`)
  console.log('Correct option is '+ questions[i].ans)
  console.log()
}
Finally at the end, after the user answers all the questions you can display the final score and some relevant corresponding message.
I have done it the following way, you can manipulate it according to your wish.
if(score===0){
console.log(`Your final score is: ${score}`)
console.log("Better luck next time!")
}
else if(score===5){
  alert(`Your final score is: ${score}`)
  console.log('All correct, You are a genius!')
}
else{
  console.log(`Your final score is: ${score}`)
  console.log('You played well!')
}
That's it. I hope you learned something from this blog!
If you liked it, I will be glad if you like, comment and share :)